Tuesday, September 11, 2018

A practical guide to testing the security of Amazon Web Services (Part 1: AWS S3)


Back in the days, the word Amazon used to refer to over half of earth's rainforests. While this is still true, it isn't what most people think of when they hear the word Amazon. Nowadays, people refer to the word Amazon as a place where they can order goods from the confort of their couches.  However, Amazon offers much more than just a online marketplace. In 2006, Amazon launched a subsidiary called Amazon Web Services (AWS) which is a platform that provides on-deman cloud computing for everyone. The adoption of AWS has grew considerably in the past years, more and more companies are now embracing AWS and deploying their web applications in the cloud offered by Amazon. But what does that mean from a security perspective?

In this series of posts, we discuss the main AWS services being used by web applications and how they can be tested from a security standpoint. We take into consideration the following services: S3, EC2, Cognito and CloudFront. For each service we give you a brief description of its usage and then an analysis of how to test the configuration of those services along with examples of possible attack scenarios.

A little overview

Amazon Web Services, simply known as AWS, offers many different cloud hosting services that companies can use when building their web applications. The wide range of services offered by Amazon can be very convenient for companies looking to outsource part (or the entirety) of their infrastructure as it provides robust and flexible solutions for building modern web applications.
Such variety of services have paved the way for new type of security considerations and new attack surfaces and, of course, when it comes to abusing AWS services the one culprit is misconfiguration.
A misconfigured service might allow unauthorized access to a resource that in turns might give access to other resources eventually spreading until the entire system has been compromised.

s3-logo

AWS S3 Buckets

Simple Storage Service (S3) is probably the most popular of the AWS services and provides a scalable solution for objects storage via web APIs. S3 buckets can be used for many different usage and in many different scenarios.

Consider the case of a web application that requires a place where to store content that is then served to users, S3 comes to the rescue. The image below depicts a scenario where a web application is making use of AWS S3 to store images uploaded by users and to further store content, such as JavaScript and CSS, used by the web application itself.


Moreover, S3 buckets can be used to store and serve static web sites by enabling the "Static website hosting" property. This property gives the possibility to store and serve only static content written in HTML, meaning that dynamic pages written in server-side code such as PHP or ASP, will not be executed.

S3 buckets can also be connected to other AWS services to provide support or enhance their features. Such synergy between S3 buckets and other AWS services inevitably results in many juice information being stored in buckets (as depicted in the picture below). For example, AWS EC2 instances' snapshots are stored in S3 buckets. As a result, a poorly configured S3 bucket will end up storing sensitive information contained in the EC2 instance possibly including, but not limited to, keys which grant access to other EC2 instances or services.

There's always a Pot of Gold at the Rainbow's End

AWS S3 buckets provide different access permissions which, if misconfigured and left open for unauthorized access, might result in many different attack scenarios. Over the past years, AWS S3 buckets have been come to be known as the primary source of leakage  when companies suffer from data breaches. No company is immune to AWS S3 buckets publicly open in the wild, and whenever a breach happens, they make their ways into major press headlines.

Booz Allen Hamilton, a U.S. defense contractor, left data publicly accessible through an insecurely configured S3 account containing files related to the National Geospatial-Intelligence Agency (NGA), which handles battlefield satellite and drone surveillance imagery.
Accenture, one of the biggest consulting agencies out there, left openly accessible AWS S3 buckets containing sensitive information including plain text passwords.
Verizon too was responsible, multiple times, of leaving misconfigured AWS S3 buckets which contained millions personal information of its customer.

Misconfigured AWS S3 buckets that leaves unauthorized access are thus abused by attackers in order to compromise the privacy of the data stored in those buckets, ultimately resulting in violating the privacy of million of users around the world.

Violation of users' privacy is not the only thing that can be achieved, being able to access S3 buckets might also provide an attacker with the knowledge he requires to access other AWS services.
If we consider a poorly configured S3 bucket that contains EC2 snapshots, then an attacker might be able to have access to those EC2 snapshots and retrieve security keys to the EC2 instance itself.
Furthermore, consider the case in which an AWS S3 bucket is used to store and serve JavaScript content to a web application. If the bucket is left misconfigured allowing an attacker to get writing access he might be able perform an attack that has been called "GhostRider". Quoting Sekhar Sarukkai, chief scientist at Skyhigh networks,
Bucket owners who store Javascript or other code should pay particular attention to this issue to ensure that 3rd parties don’t silently overwrite their code for drive-by attacks, bit-coin mining or other exploits. Even benign image or document content left open for overwriting can be exploited for steganography attacks or malware distribution.
It thus become crucial to be well aware of which AWS S3 buckets are configured and how to properly test the permissions on those buckets so to avoid misuse.

Get your hands dirty

The first step when testing the security of S3 buckets is to identify the location of the bucket itself, meaning the URL that can be used to interact with the bucket.
Note that S3 buckets have unique names, meaning that two different AWS users cannot have a bucket with the same name. This fact can be helpful when trying to guess the name of a bucket knowing the name of the web application.

Let's start by considering a bucket named mindeds3test.
The URLs schemas that can be used to interact with the bucket are:
https://s3-[region].amazonaws.com/[bucketname]/
http://[bucketname].s3.amazonaws.com/

Moreover, if the bucket has the property "Static website hosting", it provides access to static HTML pages via the following URL:
http://[bucketname].s3-website-[region].amazonaws.com/

S3 bucket identification

As described above, the identification of a bucket boils down on identifying the URL that identifies the bucket. There are many different ways to do so.

HTML inspection

Let's start very easily and consider the HTML code of the web application under analysis. It might in fact happen that you might find S3 URLs directly in the HTML code, saving you the trouble of looking around for the buckets. Start by having a look at the HTML code and the resources loaded by the web page in order to identify S3 buckets.

Brute-force

A brute-force approach, possibly based on a wordlist of common words along with specific words coming from the domain you're testing, might also do the trick. For example, we can use the Burp Intruder to perform a series of request to the URL http://s3.amazonaws.com/[bucketname]. This URL does not identify a bucket however, it responds with a convenient PermanentRedirect message in case a bucket is found and a NoSuchBucket message otherwise.

In the intruder tab configure as target host http://s3.amazonaws.com, then move to position and setup a simple get request and put the payload position right after the / character of the request. Proceed to the Payloads section and load your wordlist, finally move to Options and in the Grep - Match panel add only a match for the word PermanentRedirect. This will help in identifying and sorting the result of the attack. Now press the Start attack button and the intruder will start performing requests and collecting results of possible buckets.


As shown in the picture above, our Grep - Match option cause the creation of an additional column in the result of the attack providing a convenient way to identify which payload corresponds to a valid AWS S3 bucket and which doesn't.

Google Dork

Google always comes to the rescue when it comes to search for URLs. You can in fact use the convenient Inurl directive to search for possibly interesting AWS S3 buckets. We report the following list of google docks that can be used to retrieve possibly juice AWS S3 buckets.

Inurl: s3.amazonaws.com/legacy/
Inurl: s3.amazonaws.com/uploads/
Inurl: s3.amazonaws.com/backup/
Inurl: s3.amazonaws.com/mp3/
Inurl: s3.amazonaws.com/movie/
Inurl: s3.amazonaws.com/video/
inurl: s3.amazonaws.com

Refer to https://it.toolbox.com/blogs/rmorril/google-hacking-amazon-web-services-cloud-front-and-s3-011613 more interesting Google dorks.

DNS Caching

There are many services out there maintaining some sort of DNS caching that can be queried by users. By taking advantage of such services it is possible to hunt down AWS S3 buckets.
Interesting services we recommend to check out are:

https://findsubdomains.com/
https://www.robtex.com/
https://buckets.grayhatwarfare.com/ (created specifically to collect AWS S3 buckets)

The following is a screenshot from findsubdomains showing how easy it can be to retrieve AWS S3 buckets by searching for subdomains of s3.amazonaws.com


Bing reverse IP

Microsoft's Bing search engine can be very helpful in identifying AWS S3 buckets given its ability of searching for domains given an IP address. Given the IP address of a known AWS S3 bucket, just by taking advantage of the ip:[IP] feature of Bing, it is possible to retrieve many other AWS S3 buckets resolving to the same IP.


Testing permissions


Once an S3 bucket has been identified, it is time to test its access permissions and try to abuse them. An S3 bucket provides a set of five permissions that can be granted at the bucket level or at the object level.

READ
At bucket level allows the to list the objects in the bucket.
At object level allows to read the content as well as the metadata of the object.

WRITE
At bucket level allows to create, overwrite, and delete objects in the bucket.
At object level allows to edit the object itself.

READ_ACP
At bucket level allows to read the bucket’s Access Control List.
At object level allows to read the object’s Access Control List.

WRITE_ACP
At bucket level allows to set the Access Control List for the bucket.
At object level allows to set an Acess Control List for the object.

FULL_CONTROL
At bucket level is equivalent to granting the READWRITE, READ_ACP, and  WRITE_ACP permissions.
At the object  levelis equivalent to granting the READ,  WRITEREAD_ACP, and  WRITE_ACP.

Testing READ

Via HTTP, try to access the bucket by requesting the following URL
http://[bucketname].s3.amazonaws.com

It is also possible to use the AWS command line and list the content of the bucket with the following command:
aws s3 ls s3://[bucketname] --no-sign-request

Note: the -no-sign-request flag specifies to not use credential to sign the request.

A bucket that allows to read its content will answer by providing a list of the content. The HTTP request will answer with an XML page while the command line request will answer with a list of files.

Testing WRITE

aws s3 cp localfile s3://[bucketname]/test-upload.txt --no-sign-request
A bucket that allows arbitrary file upload will answer with a message showing that the file has been uploaded

upload: Pictures/ec2-s3.png to s3://mindeds3test01/test-upload.txt

Testing READ_ACL

aws s3api get-bucket-acl --bucket [bucketname] --no-sign

ACL can also be specified for a single object and can be read with the following command:
aws s3api get-object-acl --bucket [bucketname] --key index.html --no-sign-request

Both commands will output a JSON describing the ACL policies for the resource being specified.

Testing WRITE_ACL

Via AWS command line:
aws s3api put-bucket-acl --bucket [bucketname] [ACLPERMISSIONS] --no-sign-request

ACL can also be specified for a single object and can be written with the following command:
aws s3api put-object-acl --bucket [bucketname] --key file.txt [ACLPERMISSIONS] --no-sign-request

Both commands do not display an output in case of operation successful.

Any authenticated AWS client

Finally, AWS S3 permissions used to include a peculiar grant named "any authenticated AWS client". This permission allows any AWS member, regardless of who they are, access to the bucket. This feature is not provided anymore but there are still buckets with this type of permission enabled.
To test for this type of permission, you should create an AWS account and configure it locally with the aws command line:

aws configure

You can then try to access the bucket with the same commands described above, the only difference is that the flag --no-sign-request should be replaces with --profile [PROFILENAME] where PROFILENAME is the name of the profile created with the configure command.

Conclusion of Part 1

AWS S3 buckets provides a convenient means of outsourcing storage resources and should thus not surprise that many companies decide to take advantage of such a service. The simplicity provided by AWS S3 for creating a bucket, overtime might result in a difficulty on keeping track of all the buckets. This post shows how to test publicly accessible AWS S3 buckets. Once a wrongly configured bucket is identified, the number one priority is to restrict its access only to authorized users.

Remember, you are one misconfigured S3 bucket away from becoming the next major press headline. 

Friday, September 7, 2018

Pentesting IoT devices (Part 1: Static Analysis)


Introduction

Intelligent dishwashers, smart factories, connected sensors and Wi-Fi fridges, these are only a few examples of everyday objects that now are connected to the Internet.
All these "brainless" objects have been upgraded to become Internet of Things devices and now they’re changing our lifestyle communicating with us at anytime and in any place.
As security experts have to face the challenge of testing the security of these devices in order to find their vulnerabilities before bad guys do.
At the same time, it is also important to make manufacturers and organizations aware of the security risks associated with this kind of devices.

This article has been written to do a brief overview of the IoT testing approach that we use during our activities here in Minded Security.
It has to be noted that this article is not to be intended as a strict guide suitable for all situations but as a starting point for developing your own testing methodology and a good arsenal of tools suitable for the majority of IoT security assessments. Now, let's start with the fun.


Preliminary Analysis

The first thing to do in order to better understand an IoT device is to perform some preliminary analysis which consists in conducting the first recon on a new firmware we have never seen before.
The main goal here is to get an idea about the firmware architecture and if it is encrypted or not.

Firmware package will be analyzed and the file system will have to be unpacked and extracted.

This process can be summarized in the following steps:

  • Identify the target device: if you don’t know what device runs your firmware, additional analysis needs to be performed for example with an internet search.
  • Understand if a firmware is encrypted or compressed: 
    • use strings against the firmware, and if there are no strings in the output the file is probably obfuscated
    • launch hexdump with the “-C” argument which provides some context for the strings. 
    • use Radare with “izz” command to search for non-ASCII characters i.e. Unicode-encoded strings.
  • Identify firmware architecture and FS: Binwalk is useful to examine and extract binary files so launch it against the firmware without any argument in order to gain useful information about it.
  • Extract the Filesystem: once the filesystem type has been identified (i.e. Squashfs, Cramfs, YAFFS2 and so on) the next steps are:
    • extract it from the firmware 
    • mount it in order to access the data inside. According to the filesystem type of your device, it is possible to use different tools like dd, binwalk or fmk to extract the fylesystem.
Below it is provided an example of a preliminary analysis performed with binwalk and regarding the DLink WiFi Day & Night DCS‑932L camera firmware.

$ binwalk DCS-932L_fw_v108_b2.bin
DECIMAL       HEXADECIMAL     DESCRIPTION
------------------------------------------------------------------------
106352        0x19F70         U-Boot version string, "U-Boot 1.1.3"
106816        0x1A140         CRC32 polynomial table, little endian
124544        0x1E680         HTML document header
124890        0x1E7DA         HTML document footer
124900        0x1E7E4         HTML document header
125092        0x1E8A4         HTML document footer
125260        0x1E94C         HTML document header
125953        0x1EC01         HTML document footer
327680        0x50000         uImage header, header size: 64 bytes, header CRC: 0x1457B432, created: 2014-02-11 05:50:43, image size: 3678347 bytes, Data Address: 0x80000000, Entry Point: 0x803B8000, data CRC: 0x6E80DDBC, OS: Linux, CPU: MIPS, image type: OS Kernel Image, compression type: lzma, image name: "Linux Kernel Image"
327744        0x50040         LZMA compressed data, properties: 0x5D, dictionary size: 33554432 bytes, uncompressed size: 6433659 bytes

As you can see from the tool output, there's a linux kernel inside a uImage at position 0x50000 and some LZMA compressed data at 0x50040 that could be the filesystem.
Let’s go ahead and unzip the firmware of the IPcamera with
binwalk -eM DCS-932L_fw_v108_b2.bin
command (the “-e” option extract the file and “-M” tells binwalk to perform the extraction recursively).

As a result you will see (inside /_DCS-932L_fw_v108_b2.bin.extracted/_50040.extracted folder) a file named 3DA000 that needs to be investigate further.
Using the command “file” it is possible to see that it is a cpio archive which contains a filesystem.

$ file 3DA000
3DA000: ASCII cpio archive (SVR4 with no CRC)

At this point it is possible to use the “cpio” command to extract the filesystem as shown below:

$ cpio -ivd --no-absolute-filenames -F 3DA000
cpio: Removing leading `/' from member names
bin
bin/chmod
bin/busybox
bin/nvram_set
bin/ls
bin/touch
bin/upgradefw
bin/ntpclient
bin/grep
bin/htmlunpack
bin/nvram_daemon
bin/ash
bin/pcmcmd
bin/sed
bin/mount
[. . .]

Finally we can see and navigate through the firmware directories:

$ ls
bin  dev  etc  etc_ro  home  init  lib  media  mnt  mydlink  proc  sbin  sys  tmp  usr  var

Please note that, you can find the same files and folders if you look inside the /_DCS-932L_fw_v108_b2.bin.extracted/_50040.extracted/_3DA000.extracted/cpio-root folder because binwalk has already extracted them, but, for the sake of completeness, we preferred to show the use of “cpio” command to extract the files.

Now that we managed to correctly extract and access the filesystem, our interest is to find any kind of security-related issues or bad practices such as:

  • Hardcoded credentials
  • Weak credentials hash contained in files like /etc/passwd
  • Custom scripts or configuration files with any kind of sensitive information
  • Web pages or binary source files that could be vulnerable to code injection
  • Private keys 
  • Links and IP addresses that could expand the attack surface of the IoT device
A great list of IoT-related vulnerabilities as well as other examples of the previous mentioned tools usage, could be found under the OWASP IoT project at the following link:


Static Analysis

In the this section we are going to present three different methods to perform the static analysis of a filesystem:

  • the first one is a full “manual” research with a small piece of automation; 
  • then we will present a tool called firmwalker that aims to scrape through the files and extract useful information;
  • finally we are going to show a fully automated tool (FACT) that automatically extract and analyze a firmware.

Manual

As you can see from the following example, grepping for the keyword “admin” it is possible to notice a file, RT2860_default_novlan, that could be interesting to further analyze. 

$ grep -iR admin
[. . .]
etc_ro/Wireless/RT2860AP/RT2860_default_vlan:#Login=admin
etc_ro/Wireless/RT2860AP/RT2860_default_vlan:#Password=admin
etc_ro/Wireless/RT2860AP/RT2860_default_vlan:AdminID=admin
etc_ro/Wireless/RT2860AP/RT2860_default_vlan:AdminPassword=
etc_ro/Wireless/RT2860AP/RT2860_default_novlan:Login=admin
etc_ro/Wireless/RT2860AP/RT2860_default_novlan:Password=admin
[. . .]

In the snippet below we printed the configuration file with some juicy information:

$ cat RT2860_default_novlan
#The word of "Default" must not be removed
Default
WebInit=1
HostName=ralink
Login=admin
Password=admin
OperationMode=0
Platform=RT3052
wanConnectionMode=STATIC
wan_ipaddr=10.10.10.254
wan_netmask=255.255.255.0
wan_gateway=10.10.10.253
wan_primary_dns=10.10.10.251
wan_secondary_dns=168.95.1.1
wan_pppoe_user=pppoe_user
wan_pppoe_pass=pppoe_passwd
wan_l2tp_server=l2tp_server
wan_l2tp_user=l2tp_user
wan_l2tp_pass=l2tp_passwd
[. . .]

Automated

Firmwalker is a script that uses a list of different interesting files and keywords inside your firmware filesystem directory to help automating the research for point of interests.
The tool bases its search on many keywords divided in category such as: binaries, passfiles and so on (for more details you can find all the keywords listed inside the /data folder, as you can see from its github page).
The tool usage is very simple because you have to specify only the filesystem folder as input:

./firmwalker.sh /cpio-root

***Firmware Directory***
/cpio-root
***Search for password files***
##################################### passwd
[. . .]

***Search for files***
##################################### *.conf
t/etc_ro/lld2d.conf

***Search for shell scripts***

##################################### shell scripts
t/sbin/vpn-passthru.sh
t/sbin/zcip.sh
t/sbin/pppoe.sh
t/sbin/config-igmpproxy.sh
t/sbin/web.sh
t/sbin/wan.sh
t/sbin/cameraname.sh
t/sbin/dhcp.sh
-------------------- password --------------------
[. . .]
t/etc_ro/web/account.htm
t/etc_ro/openssl.cnf
t/etc_ro/Wireless/RT2860AP/RT2860_default_vlan
t/etc_ro/Wireless/RT2860AP/RT2860_default_novlan
[. . .]


***Search for ip addresses***

##################################### ip addresses
0.0.0.0
10.10.10.100
10.10.10.200
10.10.10.251
10.10.10.253
10.10.10.254
1.2.3.4
1.5.6.1
1.6.4.4
[. . .]

As you can see it's easy to find some potentially sensitive files or scripts or other private data. You can also notice that firmwalker has found something interesting in RT2860_default_novlan file so it has listed that under the "password" category. This behavior is due to the fact that, like we made manually, firmwalker has identified the keyword "admin" inside the file and specifically it is listed in firmwalker data/patterns file, as you can see from the tool source code.

Note: dealing with firmwalker, you'll have to install shodan cli or comment out the code lines that handle that part since the tool exits if shodan cli is not installed. More information about this bug.

FACT: firmware extraction and static analysis

“The Firmware Analysis and Comparison Tool (formerly known as Fraunhofer's Firmware Analysis Framework (FAF)) is intended to automate most of the firmware analysis process. It unpacks arbitrary firmware files and processes several analysis. Additionally, it can compare several images or single files.”

If you need a fast and fully automated analysis this tool is what you are looking for. Without knowing anything about binwalk, firmwalker and so on it is possible to get the same results in terms of firmwares extraction and static analysis using FACT. Below we have listed the main features of this tool:

  • Easy to use thanks to the graphical web user interface
  • Fully automated process of extraction and static analysis
  • Expansible with custom plugins

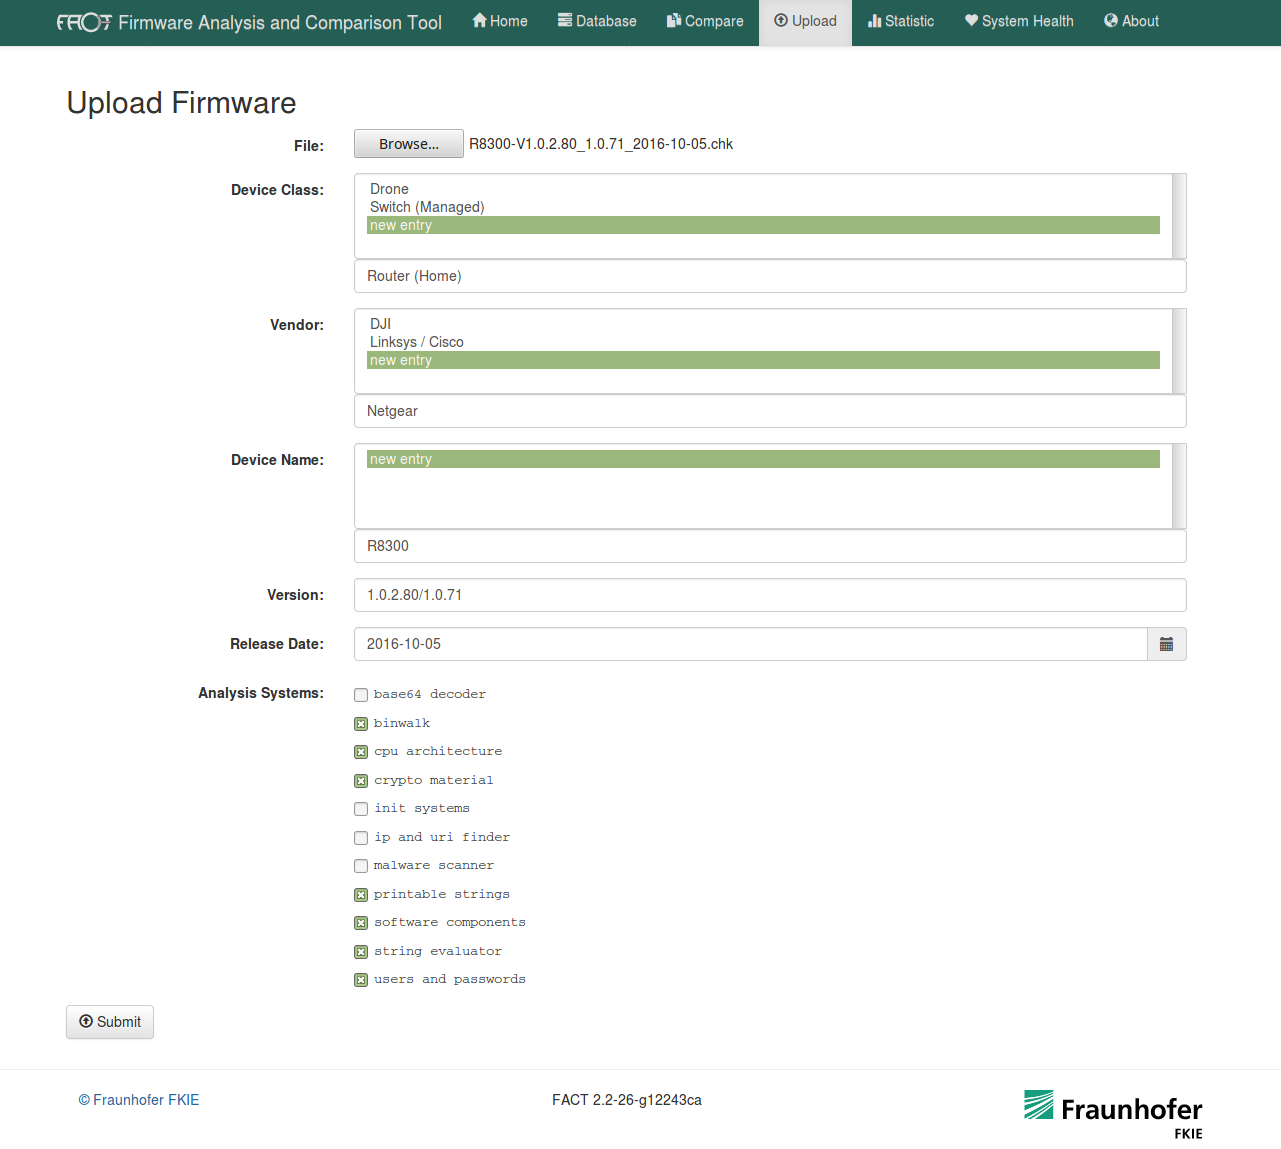
In order to test FACT functionalities, we used the aforementioned Dlink firmware as input and we selected different analysis options, as shown in the below picture:

Different kind of tests that FACT can perform against a firmware

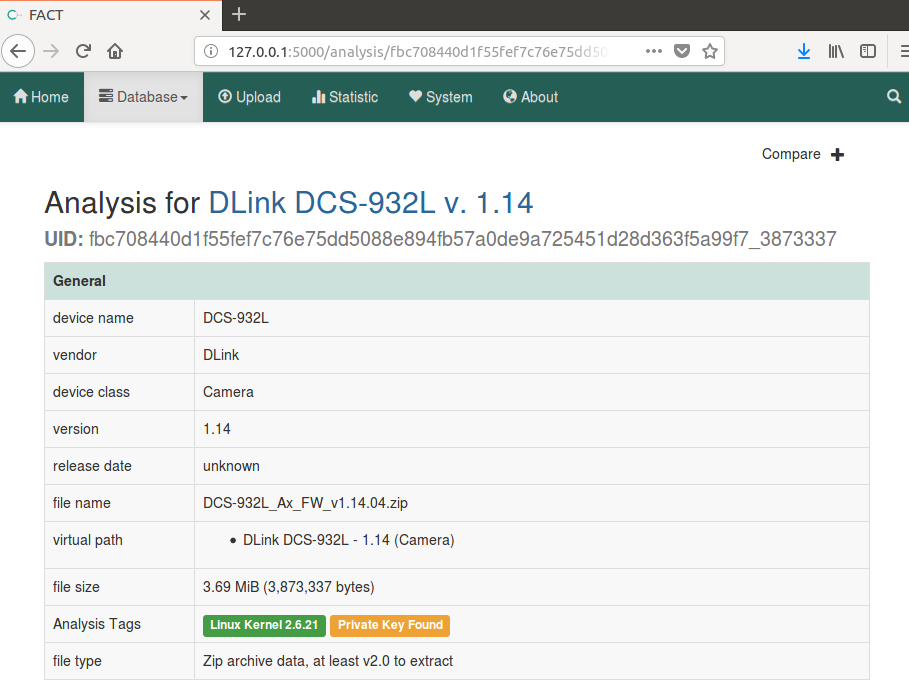
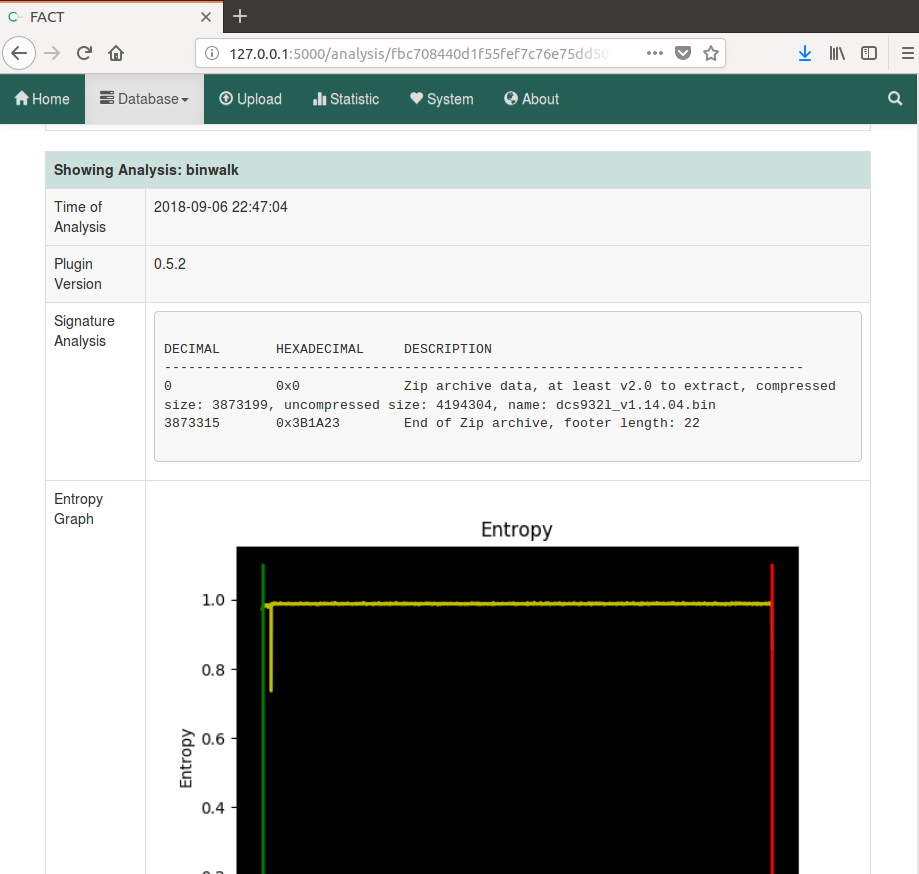
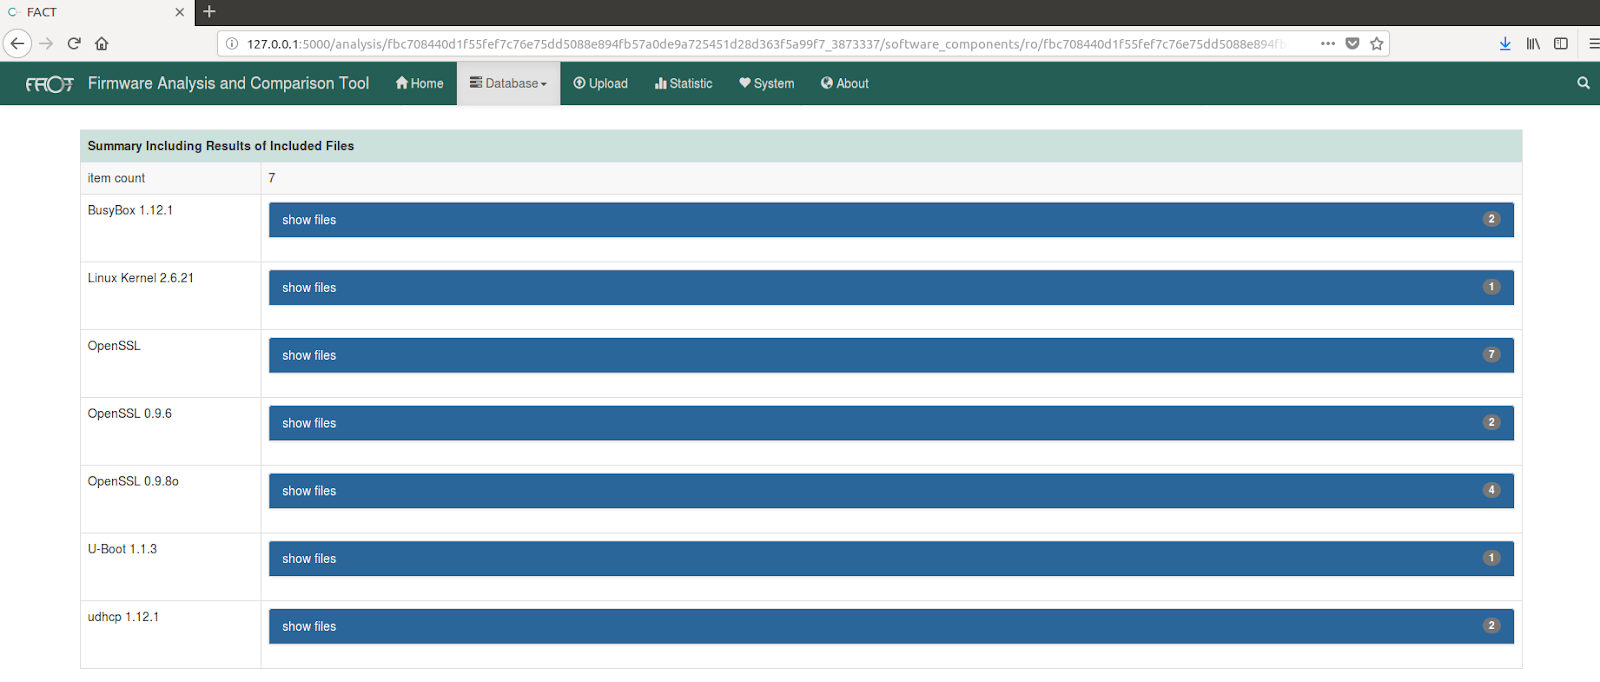
Once the analysis are over, it is possible to review the results through different sub-menus. For example, as you can see in the below images, FACT has provided: general information about the firmware, a binwalk analysis with also an entropy graph useful to show if a firmware is encrypted and the name of some firmware binaries.

General information about the analyzed firmware

Binwalk and entropy analysis results

Binaries found inside the firmware 
As a final consideration about this tool, we can say that: FACT allows a fast firmware analysis because all you have to do is feed it with a zip file containing the binaries and it will perform a complete static analysis through many tools.


Using the outputs to find vulnerabilities

To further investigate the aforementioned issue of the harcoded credentials, let's download from here the known-vulnerable Dlink-412 router firmware and manually analyze it in order to find some credentials left inside configuration files or custom scripts, which is usually a common problem in such kind of devices.

Once the filesystem is extracted through binwalk, it is possible to dig into it and search for possible misconfigured services like ssh or telnet that could allow a remote attacker to access the device. By using grep command with the "telnet" keyword, some interesting data can be quickly noticed.

$ grep -iR telnet
[...]
etc/init0.d/S80telnetd.sh: telnetd -l /usr/sbin/login -u Alphanetworks:$image_sign -i br0 &
etc/init0.d/S80telnetd.sh: telnetd &
etc/init0.d/S80telnetd.sh: killall telnetd
[...]

At this point it is already clear that using grep we have found an interesting script, S80telnetd.sh, that manages the telnet service. Currently, by analyzing the whole etc/init0.d/S80telnetd.sh script you can notice that telnetd process is going to be started with an hardcoded credential set: Alphanetworks as username and the content of image_sign variable as password.

$ cat S80telnetd.sh 
#!/bin/sh
echo [$0]: $1 ... > /dev/console
if [ "$1" = "start" ]; then
if [ -f "/usr/sbin/login" ]; then
image_sign=`cat /etc/config/image_sign`
telnetd -l /usr/sbin/login -u Alphanetworks:$image_sign -i br0 &
else
telnetd &
fi
else
killall telnetd
fi

In order to recover the password of the telnet service, we have to print the content of /etc/config/image_sign file.

$ cat ./config/image_sign
wrgn28_dlob_dir412

Finally we have discovered that the telnet server of the router is going to be executed with a preset of hardcoded credentials (Alphanetworks:wrgn28_dlob_dir412) and this misconfiguration represents a serious security concern because it could allow a malicious user (who knows this information) to easily break into the router.
It is interesting to notice that this kind of vulnerability can be found only by performing an effective manual code review and, tools such as firmwalker or FACT, can only help to identify interesting entry points (like the presence of a telnet service).

Conclusions

In this article on Pentesting IoT via static analysis we have shown a simple step by step guide to manually approach and analyze an unknown firmware. In particular we have discussed three different approaches to static firmware analysis (manual, automated and fully automated) through different practical examples. Lastly, we have highlighted how static analysis can be useful in finding a specific class of vulnerabilities.
The guide will continue in a second article, where we will deep dive into the dynamic analysis of the firmware.

References

  • https://reverseengineering.stackexchange.com/questions/15006/approach-to-extract-useful-information-from-binary-file
  • https://www.pentestpartners.com/security-blog/using-hexdump-analysis-for-firmware-extraction-a-how-to/
  • https://resources.infosecinstitute.com/firmware-analysis-for-iot-devices/
  • https://firmwaresecurity.com/
  • http://elinux.org/File_Systems
  • https://fkie-cad.github.io/FACT_core/

Monday, July 30, 2018

Microservices Security: Dos and Dont's

Microservices

Last week we were invited as speakers by a very big enterprise for an internal event/conference and we decided to present an analysis of the most interesting issues on microservices we found in the last years during Minded Security activities.


Abstract:
More and more enterprises are restructuring their development teams to replicate the agility and innovation of startups.
In the last few years, microservices have gained popularity for their ability to provide modularity, scalability, high availability, as well as make it easier for smaller development teams to develop in an agile way. But how do they deal with security? what about security contexts? 
This talk will give insights about the most interesting issues found in the last years while testing the security of multilayered microservices solutions and how they were fixed.


Direct link to the presentation

Wednesday, May 2, 2018

Antitamper Mobile - Minded Security's Magik Quadrant for Mobile Code Protection (2018 Edition)


Minded Security's Magik Quadrant for Mobile Code Protection shows our evaluation of the top vendors in this market, based on our research and experience, updated to 2018.

Magik Quadrant


Why care about Code Protection?

The main reason lies in the fact that Mobile Applications runs within an environment that is not under the control of the organization producing the code.

Lack of Code Protection could have the following consequences:
  • Malicious users or competitors could decompile the application and gain knowledge about proprietary algorithms or intellectual property
  • Using this information, it could be possible to modify the code, repackage it and redistribute it to create a "trojanized" clone of the App
  • Revenue loss due to piracy
  • Reputational damage

Since 2016, the OWASP Mobile Top 10 has included two new categories related to that, that is M8-Code Tampering and M9-Reverse Engineering.

Code Tampering

Code Tampering is the process of changing a mobile app (either the compiled app or the running process) or its environment to affect its behavior.
The most common code tampering techniques are:
  • Code Injection
  • Binary Patching
  • Local Resource Modification
  • Method hooking
  • Method Swizzling
  • Dynamic Memory Modification  
Tools and frameworks like Frida, Substrate, Cycript, Xposed and FLEX could give an attacker direct access to process memory and important structures such as live objects instantiated by the app. 
They come with many utility functions that are useful for resolving loaded libraries, hooking methods and native functions, and more.
This can provide the attacker a direct method of subverting the intended use of the software for personal or monetary gain.

Code Tampering could be prevented by detecting at runtime that code has been added or changed since compile time.

Reverse Engineering

Reverse engineering a mobile app is the process of analyzing the compiled app to extract information about its source code. 
An app is said to be susceptible to reverse engineering if an attacker can derive a reasonably accurate reconstruction of the source code from the binary.
Reverse Engineering could be prevented by using an obfuscation tool that implements controls like:
  • String Encryption
  • Name obfuscation
  • Control flow obfuscation
  • Arithmetic obfuscation


Also to that, it is important to implement anti-debugging techniques and verify if the application is running on a rooted/jailbroken device.


Some commercial tools provides code protection without requiring developers to implement their own custom controls.
The remaining of this blog post is going into details about the tools available in the market in 2018.

Interpreting the Magik Quadrant

The Magik Quadrant study performed on Code Protection solutions takes into account multiple criteria based on Ability to Execute and Completeness of Vision.

Ability to Execute
Vendors must deliver strong functionality in the following areas of capability:
  • Techniques implemented
  • After Sale Support

Completeness of Vision
Completeness of vision in the Code Protection market considers a vendor’s vision and plans for addressing buyer needs in the future:
  • Cross-platform support
  • Innovation
  • Sale Strategy

Before proceeding, it is worth noting that focusing on the leaders' quadrant isn't always the best choice. There are good reasons to consider market challengers. Moreover a niche player may support a specific needs better than a market leader.


Leaders
Leaders offer products and services that best cover current scenarios and are well positioned for the future. They provide solutions that are cross-platform, so with one vendor is possible to protect many platforms. Their complex solutions provide protection (through obfuscation, encryption, call hiding etc.), detection and reaction (in case an attack is detected).

Visionaries
In general, in any Magik Quadrant the Visionaries are the innovators. They understand well where the market is going and therefore they can provide innovative techniques to protect the applications in a cross-platform environment.

Niche Players
Niche Players, in our research, are vendors that do not offer, at the moment, a cross-platform solution but they are focused on a small segment. Since they are offering platform-specific solutions, in some case they are able to provide innovative and specific solutions for that specific target.


Vendor Strengths and Cautions

Arxan

This analysis pertains to Arxan's Application Protection.

Arxan is one of the most trusted names in application security. They provide protection against a widest range of static and dynamic attacks. The protection, provided by Application Protection, is implemented on different layers giving the chance to select the desired level of security.

Strengths:
  • Cross-platform: Android, iOS (Objective-C and Swift applications)
  • No changes to the source code 
  • Protection from reverse engineering and disassembly through obfuscation
  • Sophisticated Anti Code Tampering techniques
  • Threat Analytics feature
  • Latest OS versions supported

Cautions:
  • Price could be higher than expected
  • Strong binary obfuscation may interfere with the application functionalities

Company website: www.arxan.com


Inside Secure

This analysis pertains to Inside Secure Code Protection and WhiteBox.
Inside Secure is one of the leaders in the application security market. They provide a cross-platform solution based on different "modules".

Strengths:
  • Cross-platform: Android, iOS (Objective-C and Swift applications)
  • Strong Code and Flow obfuscation
  • Anti-tampering techniques
  • Strong cryptographic key protection

Cautions:
  • Price could be higher than expected
  • Strong binary obfuscation may interfere with the application functionalities

Company website: https://www.insidesecure.com/


Intertrust

This analysis pertains to Intertrust whiteCryption.
Intertrust is relatively new on this market but offers an innovative product that is designed to protect applications at all levels.

Strengths:
  • Pioneers in Whitebox Crypto 
  • Cross-platform: Android, iOS (Objective-C and Swift applications)
  • Tamper Resistance
  • Self-defending code
  • Code obfuscation
  • Anti-debugging techniques
  • Cross-checking of shared libraries 

Cautions:
  • Price could be higher than expected

GuardSquare

This analysis pertains to GuardSquare DexGuard and iXGuard.
GuardSquare is very famous since they develop and support ProGuard, that is the successful open source obfuscator for the Java language used for Android application. DexGuard is derived from that, while offering more advanced and sophisticated protections.
They have a great experience in Java and Android platform and recently they started offering also iOS support through the iXGuard software.

Strengths:
  • Solution is solid and one of the most used thanks also to the Proguard integration in Android Studio
  • Cross-platform: Android (Cordova and PhoneGap supported), iOS (Objective-C and Swift applications)
  • Large adoption among our customers
  • Strong code optimization and obfuscation 
  • Anti-tamper detection available for the Android platform

Cautions:
  • At this time iXGuard is offering only reverse engineering and not Anti-tampering protections for the iOS platform
  • As demo policy seems to be changed during 2017, it's harder to obtain evaluation versions; this could be a factor to consider if you have a time-constraint project
  • Price also has increased
  • Solution is one of the most used so it may be easier to find deobfuscation tools/information comparing to other solutions in the market

Company website: https://www.guardsquare.com


Licel

This analysis pertains to Licel's DexProtector.
Licel is a new competitor in code protection. Its product, DexProtector, is designed for comprehensive protection of Android applications mainly against reverse engineering, clone protection and tampering.

Strengths:
  • Affordable for our clients
  • Strong code obfuscation
  • Clone protection
  • SSL Pinning support
  • Root and Debug Detection

Cautions:
  • Available only for the Android platform
  • Some feature like Hooks Detection are additional features of the Enterprise version and priced separately

Company website: www.licelus.com


Bangcle - SecNeo

This analysis pertains to Bangcle AppShield, AppSCO and WhiteCrypto.

Strengths:
  • AppShield offers protections against debuggers, tampering, decompilation and malware insertion for Android applications
  • AppSCO offers reverse engineering protections (Android and iOS platform)
  • WhiteCrypto offers strong key protections (Android and iOS platform)

Cautions:
  • Anti Code tampering techniques are only offered for the Android platform 

Company website: http://www.bangcle.co.kr - https://www.secneo.com


Zelix

This analysis pertains to Zelix KlassMaster.
Zelix has a long story and experience in code obfuscation. Since its release in 1997, the Zelix KlassMaster Java code obfuscator has been continually developed to keep it at the forefront of obfuscation technology.
This solution provides a Java code obfuscator but it does not implement other protections such as those against code tampering attempts.

Strengths:
  • Strong code and flow obfuscation
  • Strong Call Hiding
  • Affordable for our clients

Cautions:
  • Available only for Java (Android)
  • Only code protection/obfuscation

Company website: www.zelix.com


Promon

This analysis pertains to Promon SHIELD.
Promon is a Norwegian firm specializing in app hardening focusing largely on Runtime Application Self-Protection (RASP).

Strengths:
  • Cross-platform: Android, iOS (Objective-C and Swift applications)
  • Rooting and Jailbreak detection
  • Repackaging Detection
  • Protections against Runtime App Tampering
  • Debugger Detection
  • SSL Pinning
  • Hook Detection

    Cautions:
    • New player in 2018 Magik Quadrant
    • "RASP" acronym usually applies to solutions that protect applications from vulnerabilities at runtime, it could not fit 100% this solution

    Company website: https://promon.co


    Important note: it is worth noting that all these security controls do not give a guarantee that mobile applications are going to be 100% secure, but they can provide additional protection and make very hard for an attacker to carry on reverse engineering, tampering and runtime attacks.


    Monday, April 30, 2018

    Shhlack, message encryption for Slack


    A common problem about centralized messaging solutions is the sharing of sensitive information during day by day use, preserving, at the same time, message integrity and privacy.

    Sometimes two parties may need to share some information that is confidential and should not be accessed by a third party.

    A third party could be, for example:
    • a service provider
    • an external attacker
    • a malicious operator of the platform

    Conversations may be exposed to third parties, for example, in case of account compromise or by storing Slack backups insecurely.

    How many users share passwords directly via Slack private messages?
    I hope just a few, but the sad truth is... probably many.


    Protecting Slack users Privacy after Policy Update


    Scenarios are getting more complex after the introduction of GDPR and new Slack privacy policy.

    Starting April 20, under the updated privacy policy, Slack compliance reports are being discontinued and the downloading options expanded. Those who buy the Plus plan can request access to “a self-service export tool” to download “all data from their workspace.” This includes “content from public and private channels and direct messages.

    And most important:

    Automatic notices to employees will be discontinued. The employer will now decide whether users will be told their conversations are being exported.

    Employers may decide to not inform users about conversation export; therefore company Slack users may not be informed of the export with a result of not being alerted of the potential data exposure.

    Even if this feature could have its benefits, it could also be abused by a malicious third party to access conversations without alerting company users.


    For more information regarding the analysis of Slack privacy policy update:


    Summing up the latter news and our previous concerns about centralized storage of sensitive information, we decided to create something on top of Slack in order to add per message encryption via pre shared keys, that's why Shhlack was created.

     Shhlack is an opensource tool available on GitHub:

    Shhlack: Welcome to the era of encrypted Slack!


    Shhlack is an extension for Slack and brings end-to-end encrypted messages in Slack workspaces.

    Shhlack is available as


    Shhlack is not a Slack bot. Instead it injects itself in the Slack web UI and uses Slack internal client APIs to encrypt/decrypt messages on the fly by choosing a passphrase from a set of stored keys owned by the user using cryptojs.AES JS library.


    When a user receives an encrypted message and owns the correct PSK, message will be shown as preformatted text:


    On the other hand any user that receives the message but hasn't Shhlack installed or doesn't own the correct PSK, will see the content as a bunch of base64 encoded "garbage":


    It supports the usage of multiple keys, meaning that a user can have more than one key that can be shared with other users.

    At the moment Shhlack relies on pre-shared keys that need to be exchanged between users to get the ability to send and receive encrypted messages.
    To facilitate PSK exchanging it is possible to import/export the keys as base64 encoded JSON object.

    Creating Messages 

    In order to create a new message click on the Shhlack icon near the message bar or press Alt+S and a dialog box will appear:


    Then:
    • To give Slack the opportunity to index some clear text data for future text based search it is possible to add a title that will be kept as clear text
    • then the user can choose a particular PSK from the storage
    • finally the super secret message can be written and sent.
    NB:
    Slack servers won't see anything in clear text, nor Slack Bots. Only users - and bots - owning the correct PSK will be able to get the unencrypted content.

    Improvements and Future Expectations

    If, as we hope, this project will get some traction from the public and a community will help us maintaining the code and add new features, there's a very exciting TODO list such as:
    • Use of browser WebCrypto features to encrypt the PSK set on the client itself with a secret masterkey.
    • Per channel encryption
    • Improve message rendering features, encrypt snippets and releated
    • Asymmetric message encryption via public/private certificates
    • your feature request!
    Enjoy Shhlack and experiment as much as you want!

    We'll be looking forward to get your feedback.


    Monday, April 23, 2018

    DOM XSS in Google VRView library


    While testing the VRView web application we discovered a DOM Based Cross-Site Scripting Vulnerability in the handling of errors through an inappropriate use of the "innerHTML" property. The use of this property must be combined with the encoding of the data before it is used for data assignment, and in this case it wasn't used safely.

    Since the vulnerability also affects two of the most used Wordpress vrview plugins, an attacker could take control of the remote system that uses these plugins through a code analysis, or through automated tools.

    Depending on the type of vulnerability and the role of the vulnerable component within the system, it can lead to trivial effects on the complete ownership of the server and the compromise of any data contained in it. The aspect to always keep in mind is that for the execution of the external components the principle of the minimum privilege is almost never applied.


    About VRView


    Vrview is a library developed by Google for embedding immersive media into traditional websites.

    As described on the main website: https://developers.google.com/vr/concepts/vrview

    VR view allows you to embed 360 degree VR media into websites on desktop and mobile, and native apps on Android and iOS. This technology is designed to enable developers of traditional apps to enhance the apps with immersive content. For example, VR view makes it easy for a travel app to provide viewers with an underwater scuba diving tour as they plan a vacation or for a home builder to take prospective buyers on a virtual walk-through before the home is built.


    The Vulnerability


    The vulnerability lies in the management of library errors, in fact, if it is specified through URL parameters: url or image, a nonexistent resource, the library returns an error including in the error message the resource specified in the request without executing the output encoding .


    As can be seen from the code below, the user input data passed through the GET request parameters is passed to the "innerHTML" property without performing the parameter encoding output. In this way, an attacker can specify an XSS payload instead of the requested resource, the library will interpret the resource as non-existent and respond with an error indicating the XSS payload entered by the attacker, thus generating an arbitrary code execution Javascript.

    The following shows the vulnerable code in the VRView library:

    URL: https://github.com/googlevr/vrview/blob/master/src/embed/main.js

    /* [...] */
    function onSceneError(message) {
        showError('Loader: ' + message);
    }
    
    function onRenderError(message) {
        showError('Render: ' + message);
    }
    
    /* [...] */
    
    function showError(message, opt_title) {
       // Hide loading indicator.
       loadIndicator.hide();
    
       var error = document.querySelector('#error');
       error.classList.add('visible');
       error.querySelector('.message').innerHTML = message;
    
       var title = (opt_title !== undefined ? opt_title : 'Error');
       error.querySelector('.title').innerHTML = title;
    }
    
    /* [...] */


    Proof of Concept


    The links below shows the vulnerability in real world example, the vulnerability includes other sub/domains that have not been mentioned such as "storage.googleapis.com".

    URL: https://vr.google.com/earth/vrview/?url=%3Cimg%20src=x%20onerror=alert(document.domain)%3E


    URL: http://googlevr.github.io/vrview/index.html?image=%3Cimg%20src=x%20onerror=alert(document.domain)%3E


    Please note that the links above contains a patched version of the library.


    Vulnerable Wordpress Plugins


    Following are the two vulnerable Wordpress plugins found during the vulnerability analysis.

    1) WP-VR-view - https://it.wordpress.org/plugins/wp-vr-view/

    WP-VR-view is a plugin that allows you to display Photo Sphere images and 360 video on wordpress pages, posts, etc.
    Website visitors will be able to navigate through your panoramas.
    Smartphone users can use Google cardboard to look through in Virtual reality way.

    Proof of Concept:
    http://example.org/wordpress/wp-content/plugins/wp-vr-view/asset/?image=<img%20src=x%20onerror=alert(document.domain)>


    2) VRView - https://it.wordpress.org/plugins/vrview/

    VRView makes it easy to embedd Googles VRView into your WordPress installation.
    Embed 360° Videos and VR Videos as Well as panorama photos into your WordPress-Installation.

    Proof of Concept:
    http://example.org/wordpress/wp-content/plugins/vrview/vrview/?image=<img%20src=x%20onerror=alert(document.domain)>


    Please refer to section A9 of the OWASP Top 10 to check if the application makes use of external components, libraries, frameworks and dependencies from modules that are affected by known vulnerabilities:

    A9 - Using Components with Known Vulnerabilities
    https://www.owasp.org/index.php/Top_10_2017-A9-Using_Components_with_Known_Vulnerabilities


    Disclosure Timeline


    • 19-01-2017 – Report to Google Security Team;
    • 20-01-2017 – Received a first feedback said that the report was triaged;
    • 20-01-2017 – Received a second feedback said that the vulnerability exists;
    • 14-02-2017 – Reply from Google Security Bot - The panel has decided to issue a reward of $3133,7;
    • 16-03-2018 – The vulnerability was fixed (https://github.com/googlevr/vrview/pull/308);
    • 23-04-2018 – Public disclosure.

    Acknowledgement


    Google VRP panel has decided to reward with a high reward as the vulnerability is included not only in sandboxed domains but also google.com.
    Vulnerability Found and Reported by Federico Fazzi.


    Monday, November 27, 2017

    JavaScript security and tools evolution talk at OWASP Taiwan Week 2017

    In this presentation are explained the modern improvements in JavaScript and Client (Browser) security features. Still, the increase of complexity in XSS attacks and vulnerabilities is driving the adoption of cutting-edge analysis tools for vulnerability discovering and analysis. At the end of the presentation, there is a demonstration of how BlueClosure can accomplish that with dynamic JavaScript analysis and fuzzing capabilities.


    Slides:
    https://www.slideshare.net/secret/NFIshhcqYVIHEp
    Conference site:
    http://2017.owasp.org.tw/speakers_01.html